Getting ready to tackle laundry day only to find your LG washing machine has no power and no lights is an incredibly frustrating experience. You press the power button, but the digital display remains completely dead, and the machine refuses to chime.
Before you panic and schedule an expensive service call or start shopping for a replacement, understand that this is a highly documented issue for both front-load and top-load LG washers. More importantly, a completely dead machine rarely means the entire appliance is broken. Often, the fix is as simple as a hard reset to clear a software glitch or replacing a $30 line noise filter.
In this comprehensive guide, we will walk you through the exact diagnostic steps, the tools you need, and the specific component tests required to restore power to your machine today.

Table of Contents
Tools Required for This Repair
Before you start tearing into your appliance, gather the following tools. Having these on hand will make the diagnostic process smooth and safe:
- Digital Multimeter: Essential for testing continuity and resistance. Make sure it has an Ohms (Ω) setting.
- Phillips Head & Flathead Screwdrivers: For removing the top panel, rear access panels, and the user interface.
- Needle-Nose Pliers: To safely disconnect tight wire harnesses without damaging the plastic connectors.
- Work Gloves & Headlamp: Appliance chassis edges can be razor-sharp, and the internal components are often poorly lit.
- Small dab of Superglue & Aluminum Foil: (Optional, needed only if you are repairing degraded UI buttons).
LG Washing Machine No Power No Lights: Quick Diagnosis and Causes
When diagnosing appliance electrical failures, efficiency is key. If you are dealing with an LG washing machine no power no lights scenario, here is a quick breakdown of the most common symptoms and their likely culprits to point you in the right direction.
Symptom | Likely Culprit |
Machine is totally dead, but the outlet works | Blown Noise Filter or failed Main Control Board (PCB) |
Stopped mid-cycle and won’t turn back on | Tripped GFCI outlet, blown thermal fuse, or overheated motor |
Powers on randomly only when pressing hard | Degraded UI (User Interface) tactile button contacts |
Display flashes briefly then dies | Shorted door latch assembly or drain pump |
The Exact Troubleshooting Order (Crucial Warning!)
Before you begin, you must understand the Golden Rule of LG Washer Repair: Never install a brand-new main control board without first testing the door latch and drain pump for electrical shorts.
A shorted door lock switch interrupts the main electrical circuit. If you assume the main control board is dead and plug a new $200 board into a washer with a shorted latch, that short will instantly destroy the new board the second you plug it into the wall. Always test the perimeter components before replacing the brain of the washer.
Front-Load vs. Top-Load Nuances
While the basic electrical flow is the same, how power failures manifest depends heavily on the architecture of your specific machine.
- For Top-Loaders (The Lid Switch): Top-load models rely on a magnetic lid switch assembly. If the plastic strike breaks off, or if the magnetic reed switch fails, the machine believes the lid is open. For safety reasons, a failed lid switch will completely sever the communication to the main board, leaving the display dark.
- For Front-Loaders (The Drain Pump Short): Front-loaders are notorious for catching coins, hairpins, and lint in the drain pump filter. If the impeller gets jammed but the machine keeps trying to drain, the pump motor will draw excessive amperage. This power surge often travels directly back up the wiring harness and fries the main PCB. This is why a dead front-loader often means replacing both the board and the pump.
Step 1: The 2-Minute Hard Reset (Try This First)
Modern LG washers are essentially giant computers. Like any computer, their main boards can freeze due to power surges or static buildup. A hard reset drains the residual capacitive charge from the PCB, clearing minor software glitches.
- Unplug the washer directly from the wall outlet.
- Press and hold the Power/Start button for 5 to 10 deliberate seconds.
- Press and hold the Play/Pause button for another 5 seconds.
- Plug the washer back in and attempt to power it on.
If the lights come on, you’ve saved yourself hundreds of dollars. If it remains dead, move to step two.
Step 2: Testing the Power Supply and Wall Outlet
Never assume your electrical outlet is working just because it worked yesterday. Washing machines draw a significant amount of power during the spin cycle and water heating phases, which can easily trip a breaker.
- Check the GFCI: If your laundry room uses a Ground Fault Circuit Interrupter (GFCI) outlet, press the “Reset” button firmly.
- Test with another device: Plug a small lamp or a phone charger into the washer’s outlet. If the lamp doesn’t turn on, the issue is your home’s electrical panel.
- Inspect the breaker: Head to your home’s electrical panel and look for a tripped breaker. Reset it if necessary.
Step 3: Inspecting & Testing the Noise Filter
The noise filter (sometimes called a line filter) is a crucial electrical component that absorbs electromagnetic interference and protects the main control board from power spikes. Power from your wall travels through this filter before reaching the main board. If the filter blows, the washer receives zero power.
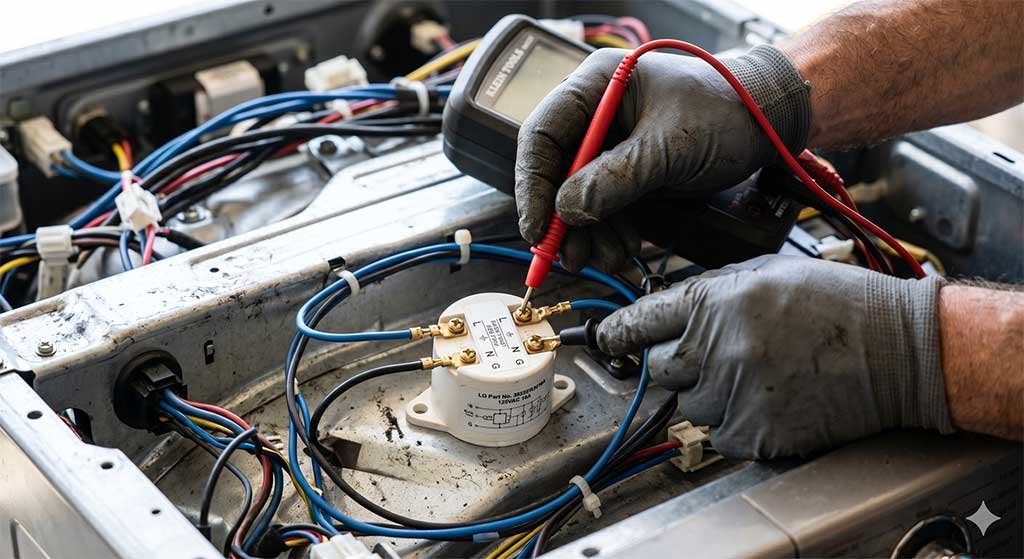
Step-by-Step Multimeter Tutorial for the Filter
- Locate the filter: It is usually positioned at the back of the washer, directly inside the top panel where the main power cord enters the chassis.
- Visual inspection: Look for a cracked plastic casing, burn marks, swollen capacitors, or a distinct burnt electrical smell.
- Calibrate the Multimeter: Turn your multimeter dial to the Ohms (Ω) setting. Touch the black and red probes together—the screen should read close to
0.00, confirming the meter works. - Test Continuity: Unplug the wire harnesses from the noise filter. Touch one probe to the Live (L) input terminal and the other to the Live (L) output terminal. Repeat for the Neutral (N) terminals.
- Read the Results: You should get a reading between 20 and 50 ohms. If the screen displays
OL(Open Loop) or infinite resistance, the filter is completely dead and must be replaced.
For high-quality OEM replacement parts, always verify your exact model number through the official LG Parts and Accessories portal.
Step 4: The Main Control Board (PCB) and the “Aluminum Foil Fix”
If the outlet and noise filter are providing power, the issue lies in the Main Control Board (PCB) or the front User Interface (UI) board.
- Look for the Red LED: Unplug the machine, remove the rear access panel to locate the main PCB (usually encased in a protective gel potting compound). Plug the machine back in. Look closely at the board—most LG boards have a small red diagnostic LED. If that light is illuminated, the board is receiving power.
- The Aluminum Foil Fix: If the main board is getting power but the front buttons are entirely unresponsive, the carbon contacts on the back of the tactile buttons have likely degraded. A popular and highly effective DIY fix is the “aluminum foil trick.” Carefully disassemble the front UI panel, clean the rubber contacts with rubbing alcohol, and use a tiny dab of superglue to attach small, hole-punch-sized circles of aluminum foil to the rubber button contacts. This metallic surface perfectly bridges the connection, restoring the button’s ability to signal the board.
(Note: This specific video perfectly aligns with our outline, visually demonstrating the hard reset, the red LED check, and the aluminum foil trick)
Step 5: Checking the Door Latch Assembly for Shorts
As highlighted in our crucial warning, a faulty door lock will paralyze the machine. The washer runs a safety diagnostic before sending power to the rest of the unit; if it detects an open circuit or a short at the door, it locks the system down.
Use your multimeter to test the pins on the door latch assembly. Find the wiring diagram (usually tucked inside the front panel) to identify the specific pins for the locking solenoid. If the multimeter reads completely open (OL) or shorted out (0 ohms where there should be distinct resistance, usually around 50-100 ohms depending on the model), replace the latch immediately before installing a new control board.
Preventative Maintenance: How to Stop This From Happening Again
Once you have your washer running, you want to protect your investment. The electronic boards in modern washers are incredibly sensitive.
- Install an Appliance Surge Protector: Do not use a standard living room power strip; they are not rated for the massive amperage draw of a washer’s heating element and motor. Buy a single-outlet, heavy-duty appliance surge protector rated for at least 15 to 20 Amps.
- Follow a Power Outage Protocol: When the grid goes down during a storm, unplug your washing machine. The most dangerous moment for an appliance is when the grid comes back on, sending a massive, unregulated spike of electricity through your home’s wiring. Wait until the lights are steady before plugging the washer back in.
Repair Costs: DIY vs. Hiring a Professional
Deciding whether to tackle this yourself or hire an LG-certified technician comes down to the cost of parts versus labor.
- Noise Filter: ~$30 to $50 (Highly recommended DIY)
- Door Latch Assembly: ~$40 to $60 (Highly recommended DIY)
- Main Control Board (PCB): ~$150 to $250 (Moderate DIY)
- Professional Labor: An appliance repair technician will typically charge a $100-$150 diagnostic fee just to walk through the door, plus an hourly rate. If the main board is dead, a professional repair can easily exceed $350-$400.
FAQs
Does an LG washer have an internal fuse?
Yes. Many LG washers feature an internal thermal fuse or a glass fuse located directly on the main control board. If the washer overheats or experiences a severe power surge, this fuse will blow to prevent a fire, resulting in a completely dead machine.
Why did my LG washer turn off mid-cycle and won’t turn back on?
If your washer dies mid-cycle, it is almost always a tripped home circuit breaker, a blown internal thermal fuse, or an overheated drive motor. Let the machine sit unplugged for 45 minutes to allow the motor to cool down, then try the hard reset procedure.
Will a broken lid switch stop the washer from powering on?
Yes. On top-load LG models, a broken lid switch acts similarly to a broken door latch on a front-loader. It breaks the safety circuit, preventing the main board from initializing a cycle or, in some cases, powering the display entirely.
Can a bad water inlet valve stop my LG washer from turning on?
No, a bad water inlet valve will not stop the machine from receiving power or lighting up. It will, however, trigger an error code (like IE) once you press start and the machine attempts to fill.
How do I know if my LG washer motor is blown?
A blown motor will not usually prevent the control panel from lighting up. However, if the motor has internally shorted, it will immediately trip your home’s circuit breaker the moment you press the “Start” button to begin a cycle.
Is it worth fixing a 10-year-old LG washing machine?
If the issue is a $30 noise filter or a simple door latch, absolutely. However, if the main control board has failed (a $200+ part) and the machine is over a decade old, the bearings and spider arm are likely nearing the end of their lifespan as well. In that scenario, investing the money into a new unit is often the wiser financial choice.
Conclusion
Dealing with an LG washing machine with no power and no lights is incredibly frustrating, but as we’ve covered, it rarely means your appliance is completely dead. By systematically working through the power source, performing a simple hard reset, and testing key components like the line noise filter and the main control board, you can pinpoint the exact issue without paying for a costly service call.
Always remember the golden rule: check your door latch for electrical shorts before installing any new electrical boards to prevent frying your replacement parts.
If you are helping a neighbor or managing multiple properties with different appliance setups, be sure to bookmark our companion diagnostic guide for a ge washing machine no power no lights situation as well.
If this guide helped you bring your LG washer back to life, or if you discovered a different fix that worked for your specific model, let me know in the comments below!


Leave a Reply