Walking up to a pile of dirty laundry only to find a completely unresponsive, dead washer is incredibly frustrating. If your ge washing machine no power no lights issue has halted your day, don’t panic.
You are likely dealing with a power supply interruption, a failed user interface, or a blown main control board. In this comprehensive diagnostic guide, we will walk through a step-by-step DIY process.
You will learn how to identify the exact failed component without wasting your hard-earned money on an expensive service call. Let’s roll up our sleeves and get your machine running again.
Table of Contents
Initial Power Checks (Rule Out the Basics First)
Before you start tearing the machine apart with a screwdriver, let’s rule out external electrical faults. It is surprisingly common for a GE washer dead situation to simply be a tripped breaker or a loose power cord.
Test the 120V Wall Outlet and Power Cord
- Verify the wall outlet actually has power using a standard household lamp or a digital multimeter.
- Plug the lamp into the exact same outlet your washer uses to confirm a stable connection.
- Check the physical integrity of the washer’s power cord. Look for any visible cuts, crimps, or burn marks on the prongs.
Inspect the Home Circuit Breaker
- GE Profile washers draw significant amperage during peak spin cycles, which can occasionally trip your home’s circuit breaker.
- Head to your electrical panel and locate the breaker dedicated to your laundry room.
- Even if the breaker does not look tripped, push it completely to “Off,” wait a few seconds, and firmly push it back to “On.”
How to Perform a Hard Reset on a GE Washer
- If the outlet is fine, try a hard reset. Unplug the machine from the wall completely.
- Leave it unplugged for a full 60 seconds to clear out soft-locks on the control board.
- Plug it back in and try to power it on. If you still have no response, the problem is definitely internal.
GE Washing Machine No power No Lights: Top 4 Hardware Culprits
If the wall outlet has power and a hard reset failed, the issue is hidden inside the machine’s casing. Let’s focus on the most common internal components that cause total power failure.
1. The Line Filter / Noise Filter
The line filter protects the delicate electronics inside your washer from sudden electrical surges. It filters out electrical noise and regulates incoming voltage.
If a power surge hits your home, the line filter acts as a sacrificial lamb. It blows out to save the expensive main board, breaking the electrical path entirely.
2. Faulty Main Control Board
The main control board is the central brain of your washing machine. It receives incoming voltage and distributes that power to the motor, the drain pump, and the display panel.
When this board fails, the entire machine shuts down. You can often spot a bad board by visually inspecting it for burnt smells, swollen capacitors, or visible black scorch marks.
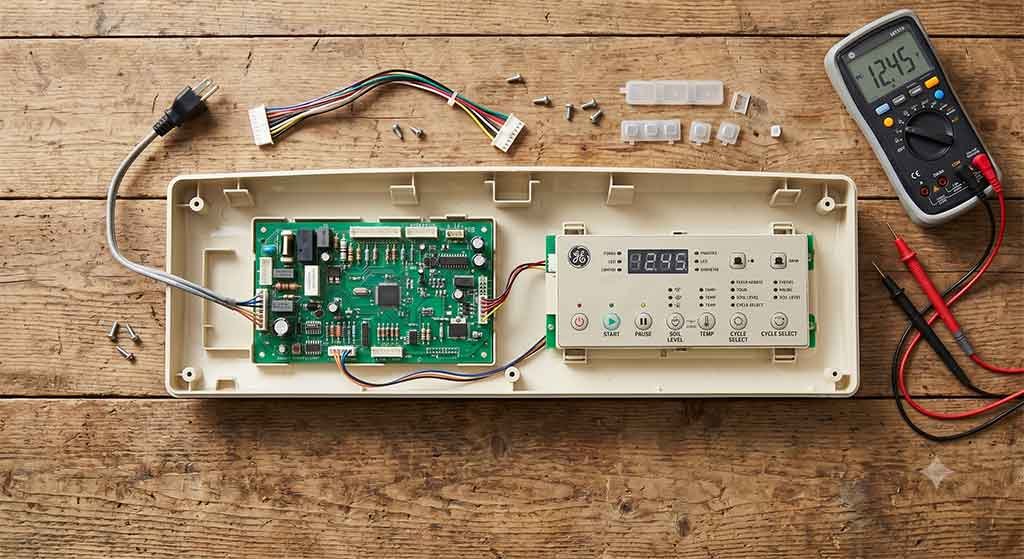
3. Defective User Interface Board
Sometimes the main board is working perfectly, but the user interface board is completely dead. This board houses the buttons, dials, and digital lights you interact with.
If the main board sends power, but this board is defective, no lights will illuminate. This is often caused by moisture damage from wet hands or liquid detergent residue.
4. Malfunctioning Lid Lock or Door Latch Assembly
A failed door lock, especially on front-loaders, can halt the entire boot sequence. Modern washers have strict safety features.
If the machine thinks the door is wide open due to a faulty latch switch, the control board may refuse to power up the display as a protective measure.
Step-by-Step Troubleshooting: GE Washing Machine No power No Lights
To accurately test these internal components, you must use proper diagnostic equipment. A reliable digital multimeter with narrow pin extensions is absolutely non-negotiable for this repair.
Let’s break down the exact sequence of electrical testing. Please remember to unplug the washer before touching any bare wires or removing panels.
Step 1: Testing the Line Filter
- Locate the line filter where the main power cord enters the machine’s cabinet.
- Set your multimeter to read AC Voltage.
- Carefully measure the voltage across the input and output terminals.
- If you read 120V entering but zero voltage exiting, your line filter is destroyed and requires immediate replacement.
Step 2: Checking the Main Control Board
- Follow the wire harness down to the main control board (usually located under the top console panel).
- Use your multimeter to test the main wire harness connection for incoming voltage.
- If 120V is reaching the board, but the board shows zero signs of life, the board itself is dead.
Step 3: Inspecting the UI Board Harness
- If the main board has power and its internal status light is blinking, inspect the wiring harness connecting the main board to the display.
- Look closely for any loose connections, pinched wires, or green corrosion on the metal pins.
- If the ribbon cable looks pristine and the main board is sending DC voltage up the line, the display itself has failed.
Diagnostic Differences: Top Load vs. Front Load GE Washers
GE manufactures drastically different architectures for their top load and front load models. Understanding these structural differences will save you hours of diagnostic headaches.
GE Top Load Models
Top loaders are generally simpler to diagnose. However, they rely heavily on mechanical shift actuators and magnetic lid switches.
A jammed shift actuator or a broken speed sensor can sometimes pull too much current. This causes the main board to lock up and mimic a completely dead machine.
GE Front Load Models (Profile & UltraFresh)
Front loaders are far more complex. They utilize heavy-duty inverter boards to drive the massive drum motor.
Focus heavily on the motor inverter board and the electronic door lock assembly. These components fail much more frequently on front loaders due to constant exposure to door gasket moisture.
Repair Costs: DIY vs. Hiring a Professional
When you finally identify the broken component, you must weigh the financial reality of the repair. Let’s look at average parts pricing versus professional labor costs.
Replacement Part | DIY Cost (Part Only) | Professional Repair Cost |
User Interface Board | $150 – $220 | $300 – $450 |
Main Control Board | $200 – $350 | $400 – $600 |
Line Filter | $40 – $70 | $150 – $200 |
Lid Lock Assembly | $30 – $60 | $130 – $180 |
If your washing machine is older and requires a new $350 main control board, it often makes more financial sense to invest in a brand-new unit rather than repairing the old one.
How to Prevent Future Power Failures
Once you fix the machine, you want to ensure this never happens again. Protecting your appliance’s sensitive electronics should be your top priority moving forward.
Install a Quality Surge Protector
Modern washing machines are essentially complex computers that wash clothes. They are highly susceptible to voltage spikes from your local grid.
Investing in a whole-home surge suppressor or a heavy-duty, appliance-rated surge protector is incredibly wise. Spending $30 on a protector can easily save a $300 board down the line.
Routine Moisture Control
Water and electricity are natural enemies. Always dry your hands completely before operating the digital control panel.
Keep the user interface dry to prevent membrane switch degradation. If you spill liquid detergent on the buttons, wipe it up immediately with a damp cloth to prevent chemical corrosion.
FAQ
Most GE washers do not have a dedicated physical reset button. To reset the machine, you must perform a hard reset by unplugging it from the wall for at least one minute.
If it dies mid-cycle, it usually points to a blown thermal fuse or a motor that overheated. The machine shuts down entirely to prevent a potential fire hazard.
Yes, absolutely. A dead short in the main drive motor can instantly pull a massive electrical load, blowing the safety fuse located directly on the main control board and shutting off all lights.
Conclusion
Diagnosing a completely dead appliance feels overwhelming at first glance. Whether you are repairing this GE model or troubleshooting a Whirlpool washing machine experiencing power failure, systematically checking the power cord, the line filter, and the electronic boards will help you confidently isolate the exact failure point.
Remember, fixing a ge washing machine no power no lights scenario is entirely possible with patience and proper multimeter testing. Do not let a silent display panel intimidate you into buying a brand-new washer immediately. Grab your tools, follow the safety steps, and get that laundry spinning again!


Leave a Reply